

Utilities
Live Monitoring System
Documentation for Live Monitoring System
Introduction
Description
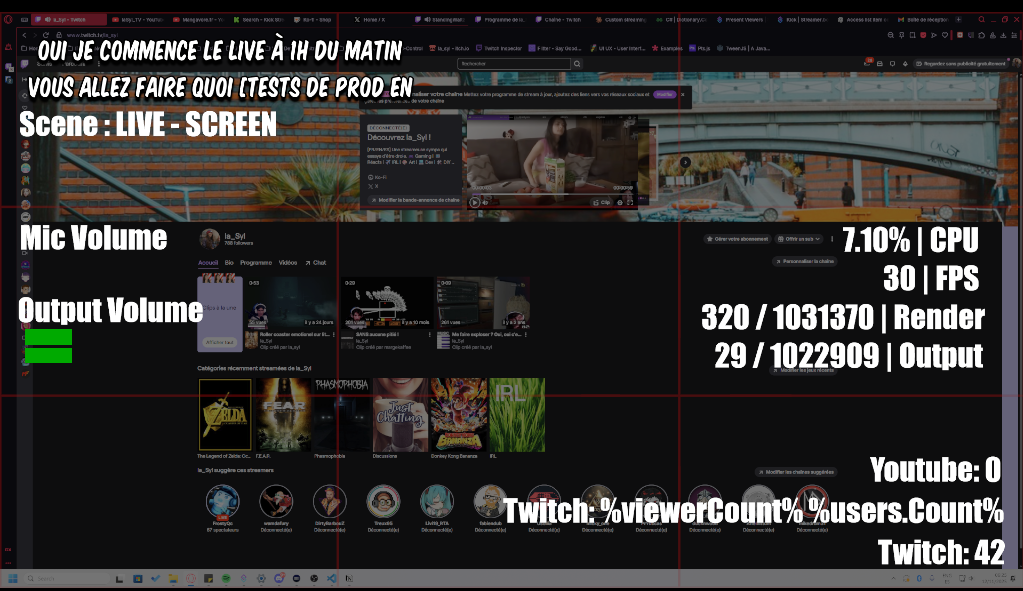
The live monitoring system is a system designed for users of a teleprompter (Elgato, etc.) who want to keep an eye not only on the chat but also on other important elements at the same time and in a single place.
Source List
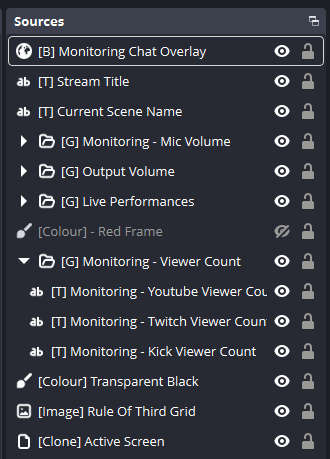
| Name | Type | Function |
|---|---|---|
| Monitoring chat overlay | Browser | Twitch chat |
| Stream title | Text | Stream title and category |
| Current Scene Name | Text | Active scene name |
| Monitoring - Mic Volume | Group | Microphone volume |
| Output Volume | Group | Stream output volume |
| Live Performances | Group | Performances displayed in OBS (CPU, FPS, dropped frames) |
| Alert Triggered | Text | Twitch alerts (alert name + viewer name + additional info) |
| Monitoring - Viewer Count | Text | Number of viewers present on the stream |
| Red Frame | Colour | A red frame to indicate that the stream is active |
| Transparent Black | Colour | A transparent colour source to reduce the brightness of the active scene return and make other information more readable. |
| Rule of Third Grid | Image | Image to ensure correct framing. |
| Active Screen | Source Clone | Source that always displays the active scene. |
Usage
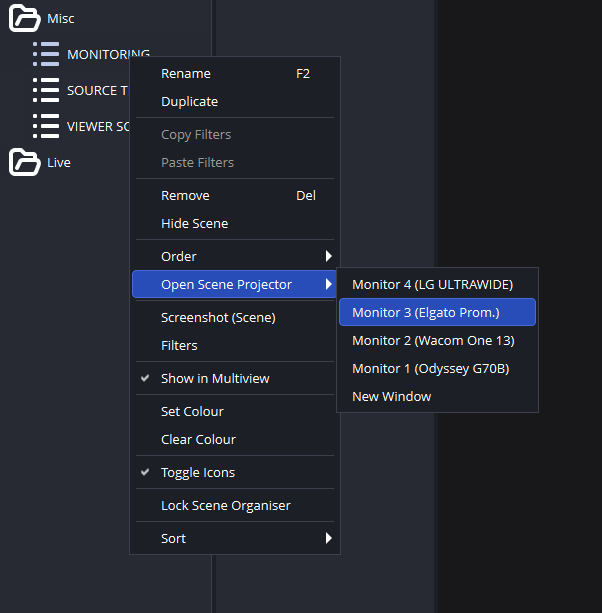
- Right click on the scene;
- Click on Open scene projector > Your monitoring screen.
The scene will be projected full screen on the screen you have selected.
Installation and Configuration
Plugin Installation
It is highly recommended to install the following plugins before proceeding with the rest of the installation if you don't already have them. Skipping this step will cause errors later.
| Name | Description |
|---|---|
| Source Copy | Plugin that allows easy copying/pasting of scenes, sources and filters. Used to import the scene. |
| Waveform | Waveform type source. |
| Advanced Masks | Allows applying filters to different types of sources. |
| Source Clone | Allows copying an already existing source to save resources. Used to see the live return on the monitoring scene. |
Import the Scene into OBS
- Tools > Source Copy > Load Scene
- Select the JSON file provided in the archive.
Update Sources
Update the properties of certain sources for them to work correctly.
| Name | Type | Required Action |
|---|---|---|
| Mic | Waveform | Select your microphone source. |
| Output | Waveform | Check that the output is correctly selected. |
| Rule of thirds | Image | Update the image file path. |
Add the Chat Overlay
It is recommended to use the streamer bot chat overlay directly.
- Create a new OBS Browser Source
- In Streamer.bot, open the chat window then go to settings > overlay.
- Copy the source URL and paste it into the
Monitoring Chat Overlaybrowser source.
Import Actions into Streamer.bot
There should normally be no configuration required for the actions to work. Once imported, you can test them directly.
If you change the name of the MONITORING scene or sources, remember to update the sub-actions.